Deploying a Machine Learning Inference Point on Kubernetes: A Beginner's Guide
- Motivation
- Overview
- Local Environment Setup
- The Streamlit Web API Build
- The API Dockerization
- Service Launching
- Next Step
- Refer
This blog post details how I deployed a machine learning inference point as a Kubernetes service using Streamlit. It’s intended for engineers new to Kubernetes.
Motivation
- Learn valuable product development skills.
- Explore Kubernetes after attending AWS meetups with free pizza served🍕.
Overview
This is an improved version of a public GitHub repository that originally deployed a Flask API as a service in kubernetes. Here, we explore four enhancements:
- Local Environment Setup: Address potential environment conflicts arising from outdated package versions and Python compatibility.
- Streamlit Web API: Replace the original web API code with Streamlit for a simpler setup and easier debugging.
- Dockerization: Containerize the application for easier deployment and environment consistency.
- Kubernetes Deployment: Leverage Minikube to deploy the containerized application as a Kubernetes service.
Local Environment Setup
After git clone that original repo, when setting up the environment, due to the repo is from 5 years, as well as the package versions, I met some issue like packages were conflicting, or the function did no exists.
For example, when loading model with the specific version scikit-learn, it raises error:
TypeError: an integer is required (got type bytes)
After googling, it tells, it is a issue related to joblib. I tried several methods to solve it, from updating scikit-learn and installing joblib, to downgrading scikit-learn, None of them are useful.
Finally, after setting up python3.7 and rebuild the environment, problems get solved.
To prevent future issues and improve clarity, I created a project.toml file. This file explicitly lists the required Python version and package versions. This allows anyone to easily set up the environment with:
cd <project directiry>
pip3 install .
The Streamlit Web API Build
In this part, challenges related to using HTTP libraries and front-end code for API design has been raised, like the post requests cannot work. This complexity made debugging difficult. To address this, I opted for a more streamlined approach using Streamlit.
Now, running the web API is as straightforward as:
streamlit run <path to main.py> --server.port <portnumber>
While Streamlit is fantastic for development and rapid prototyping, a senior data scientist offered valuable production deployment insight:
In production environments, data scientists typically focus on building robust Flask APIs to handle requests efficiently. The front-end design is often a separate task undertaken by user interface development specialists. This separation of concerns ensures optimal performance and maintainability for large-scale deployments.
The API Dockerization
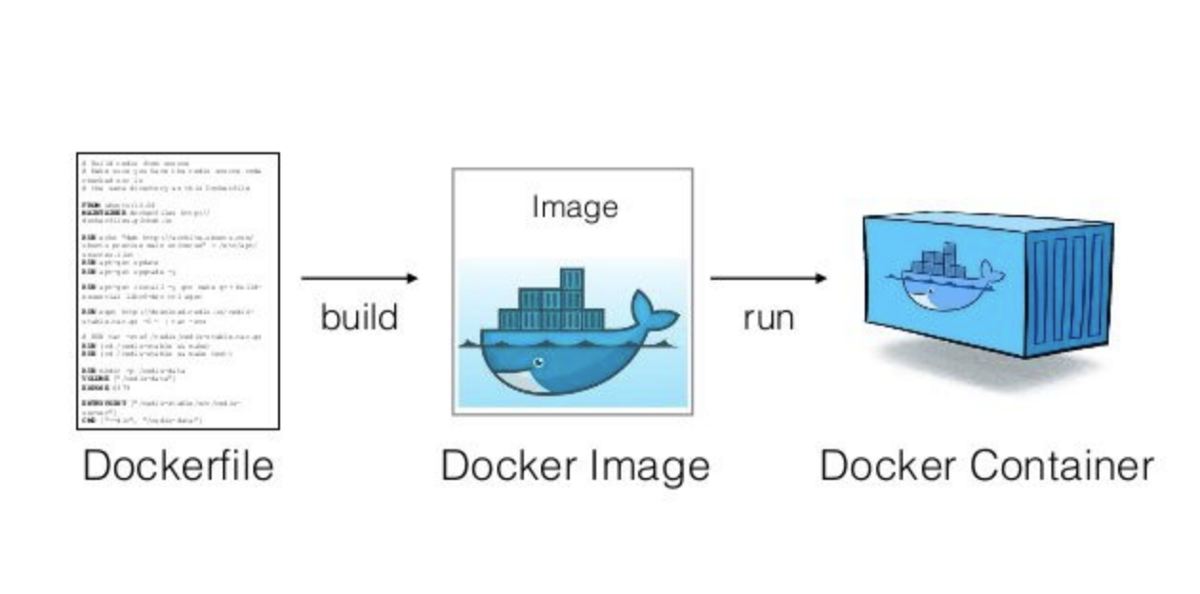
Running the web API locally is a great first step, but for deployment on different platforms, environment consistency becomes crucial. Here’s how Dockerization simplifies the process:
- Benefits of Docker: Docker containers encapsulate the application with all its dependencies into a single, portable unit. This eliminates environment-specific setup issues, ensuring your application runs consistently across different platforms.
- Streamlined Sharing: Docker images are easy to share and store in public registries like Docker Hub. This allows us (or others) to quickly deploy the application on any Docker-enabled platform.
While Docker Compose can be valuable for managing multiple containers with linked services, for this project, a simple Dockerfile suffices.
Here’s a breakdown of the commands for building and running the Docker image:
- Building the Image: Navigate to the directory containing the Dockerfile and run:
cd <Dockerfile directory>
docker build . --tag=<image-name>:<version>
This builds a Docker image with the specified tag (
- Running the Container: To run the container based on the built image, use:
docker run -p <local port>:<api port in dockerfile> --image=<image-name>:<version>
This command starts a container from the image, maps the container’s internal API port (
Managing Containers (Optional):
- Use
docker psto list running containers. - Use
docker rm <container-id>to remove a specific container.
- Use
Alternatively, for a more automated approach, you can use docker-compose up to build and start the container, and docker-compose rm to remove it.
Service Launching
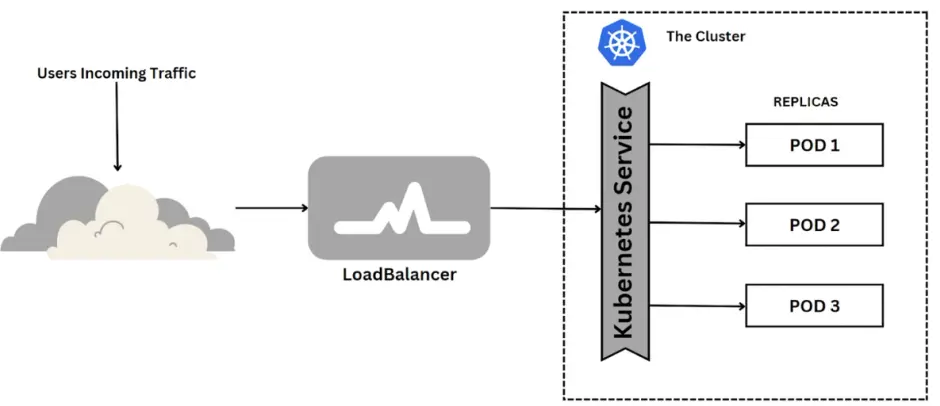
In this section, I utilize minikube, running within a Docker Desktop container as a node. I recommend that beginners start with minikube due to its simplicity and rapid deployment capabilities, rather than diving into AWS Kubernetes. Now, let’s initiate the minikube service in a new terminal:
minikube service
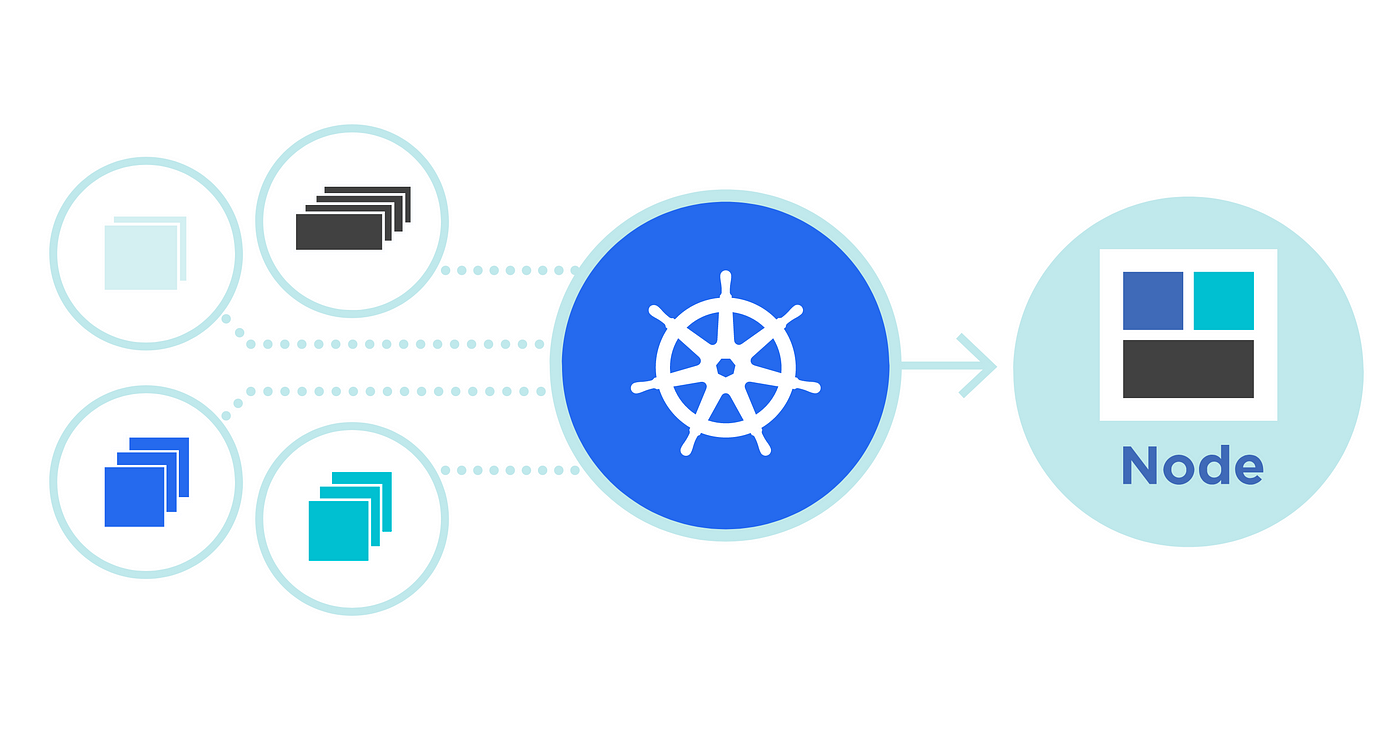
Firstly, set up a image as a deployment with total 3 pods
kubectl create deployment <deployment-name>  --image=veraz00/<image-name>:<version>
kubectl scale deployment/<deployment-name> --replicas=3
Next, this is launched as a service
kubectl expose deployment/<deployment-name> --type=LoadBalancer --name=<service-name> --port=<api-port-in-container> --target-port=<service-port>
--type=LoadBalancer: expose the service to the internet--port=<api-port-in-container>: it specifies the port on which the service will listen. It would match the port the applciation inside the container is set to listen to--target-port=<service-port>: the<service-port>is the port to which the traffic will be forwarded to. It would be the port on the pods. Here can be randomly assigned
Finally, I used the following command to make this sevice from outside the minikube environment:
minikube service <service-name>
My output would be the following:
|-----------|------|-------------|---------------------------|
| NAMESPACE | NAME | TARGET PORT |            URL            |
|-----------|------|-------------|---------------------------|
| default   | medv |        7658 | http://192.168.49.2:32485 |
|-----------|------|-------------|---------------------------|
🏃  Starting tunnel for service medv.
|-----------|------|-------------|------------------------|
| NAMESPACE | NAME | TARGET PORT |          URL           |
|-----------|------|-------------|------------------------|
| default   | medv |             | http://127.0.0.1:36577 |
|-----------|------|-------------|------------------------|
🎉  Opening service default/medv in default browser...
❗  Because you are using a Docker driver on linux, the terminal needs to be open to run it.
Opening in existing browser session.
kubectl port-forward service/medv 7658:8765
http://192.168.49.2:32485: The IP address is assigned by Minikube and typically points to the Minikube virtual machine or Docker container running the Kubernetes cluster. The port number (32485) is dynamically allocated by Minikube to expose the service’s target port (7658 in this case) externally.When request comes from ` http://192.168.49.2:32485
, **it would be mapped into the internal7658` port of any pod, then go to the application port where the api in the container is assigned**.http://127.0.0.1:36577: This IP address is the local machine.36577is the port number on which the service or application is listening.By sending request from
http://127.0.0.1:36577, it would be send into the internal7658port in one of pod, then in the pod, api would be called.
Here I can use http://127.0.0.1:36577 to access the service from the local machine, but not able to use http://193.168.49.2:32485, for currently I set minikube as a container using Docker Desktop, which is isolated from the host computer.
To be able to use this link http://193.168.49.2:32485, it requires services within minikube to be accessible from the host, a minikube tunnel must be established. This tunnel creates a bridge between the host and the isolated network environment of the containers, allowing for direct communication.
Next Step
- Set up the service into public, and figure out the ports and ip adress here
- Try the aws kubernetes
- Go to meetup involving the kubernetes with product